Evaluating the components of the simple flour, egg, and butter shell produced by Escoffier and the latest recommendations, I developed a perfect general-purpose crust. It is a tart dough that is easy to work with, flexible, sizable, flaky, and tasty. I then made very minor adjustments and produced a second recipe — The Perfect Sweet Tart Crust.


Sounds perfect huh? By replacing some butter with crème Fraiche (or plain creme, if you don’t have crème Fraiche handy), but still keeping one egg, this perfect texture is created. The flexibility comes from solving of solving the problem of adjusting sizes. An egg is a nice addition to a tart crust, but it is difficult to work with say half an egg. Specifically, one egg seems too much fat and moisture for a 9″ (23cm) shell. But one egg is maybe not enough for an 11″ (29cm) crust. Adjusting the amount of crème Fraiche solves this — it allows me to work with either size tart. You can follow my process here or just follow the recipes below.
Perfect for a Dessert Tart or a Fruit Gallete
You can use this tart crust for almost any dessert tart where a pie-like crust is needed such as in my Southern Pecan Tart. Contrast this dough with the Pâte Sablée used in my tarte au citron, which is a more fine crust for a different need.
Below you will find a recipe for 9″ tarts and one for 11″. For the 9″ tart, the recipe makes two crusts. Why two? It is the result of balancing the egg and crème Fraiche in just the right proportions. Don’t worry, you can make one now and freeze the other ball of dough for another day.
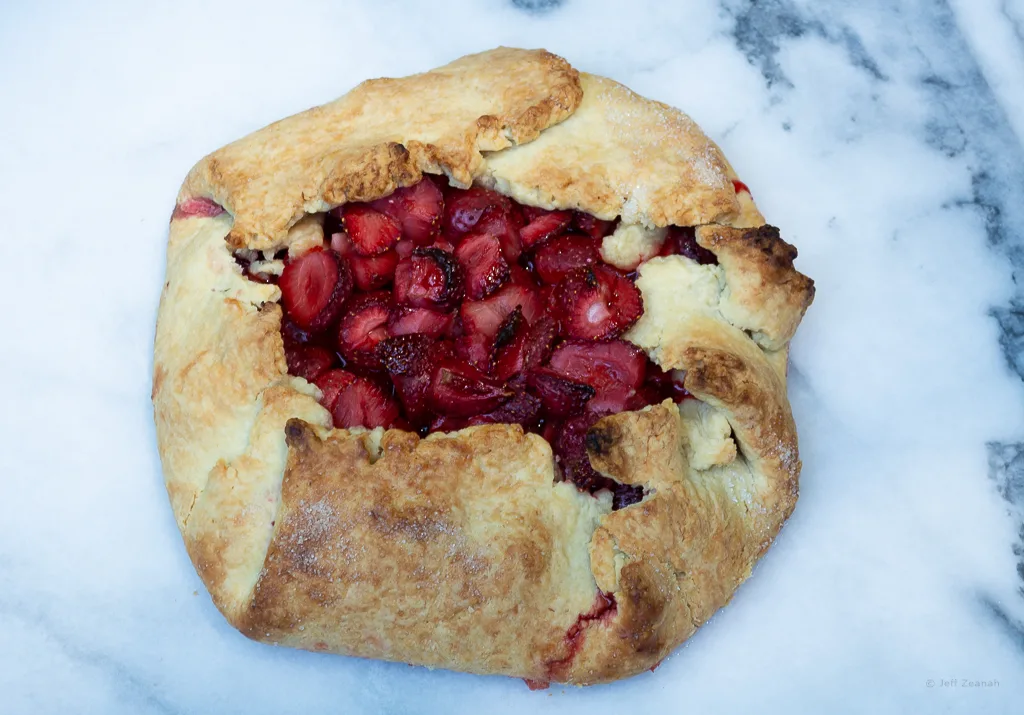
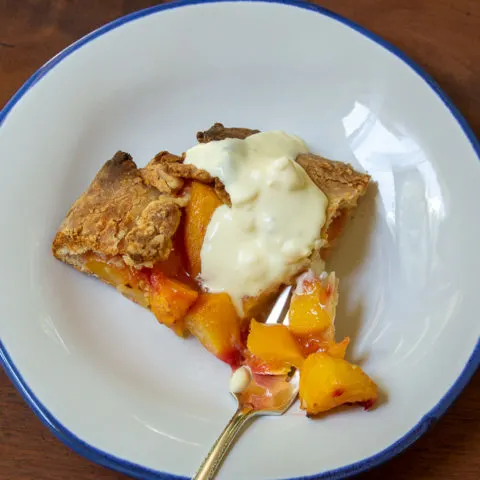
Making a Fruit Galette
The easiest use of this dough is for a Fruit Galette as shown below. These free-form tarts are so easy to make as the photos show.


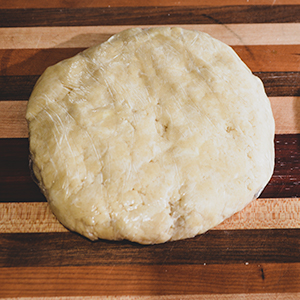
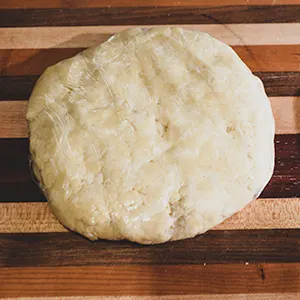
head start to shaping the tart


The full recipes for the sweet tart crust are below. But first some key tips for making a successful dough.
Four Rules to making a successful tart dough
Rule 1: Use your freezer — Making a dough that stays together requires cold butter. Working the dough should only take 3 to 5 minutes. Chilling your mixing bowls and paddles before processing makes this easier. This is especially useful when making your pastry by hand.
Rule 2: Be careful adding water — pastry recipes are all over the place concerning the amount of water to be added. (Use cold water, BTW — see rule 1.) This is because the amount of water in flour can vary due to storage conditions and humidity. The amount of water in butter can vary also. Therefore, add water a bit at a time, just enough to get the dough to stick together.
Rule 3: Avoid stretching the dough — Roll the dough out, instead of pulling. To the degree you stretch, it will shrink back when cooking. Nonetheless, rolling out in itself involves some stretching. That is where rule 4 comes into play…
Rule 4: Chill your dough in a disc — I do not remember where I first saw this hint, but it was a “that’s brilliant” moment. When forming the dough for chilling, shaping it into a disc instead of a ball gives you a significant head start to producing a shell without stretching. If the dough is not sticking together well, you can even place it on the wrap and use the wrap to help bring the dough together. An example of the disc is shown in the above images.
The recipes
Important Note about Sizes
The following are two recipes of different sizes. The 9″ version produces enough dough for 2 tarts if using a 9″ (23cm) pan. If making fruit galettes it will make 3 smaller galettes (each with 4 servings) or 2 larger galettes. The 11″ version produces enough dough for a 11″ (28cm) tart pan or 2 galettes (4 servings each). In all cases, if you have leftover dough, please freeze it. It keeps well and you are ready for your next tart.
Important Note about Pre-baking
Both recipes include notes about pre-baking. This is a necessary step if you are using a crust in a tart pan. However, this is not necessary for the Fruit Galettes.
Related Posts


The 9″ (23cm) version

The Perfect Sweet Tart Crust 9" (23cm) Version
This dough will make two 9" (23 cm) tart shells
Ingredients
- 360g (12.7 ounces or 2 ½ cups) Flour
- 35g (1.25 ounce or 7 ½ tablespoons) Sugar
- 7g (1 ¼ teaspoon) Salt
- 1 large egg
- 170g (6 ounces or 12 Tablespoons) butter chilled and cut into about ½ inch (1 cm) cubes
- 65g (2.3 ounce or 4 ½ Tablespoons) crème fraîche
- 30ml (⅛ cup) water, cold
Instructions
To make the dough
- If using a mixer, chill the bowl, paddle in the freezer for at least 20 minutes.
- Whisk the flour, sugar, and salt together.
- Assemble the mixer and bowl, add dry ingredients. With the mixer on low again, slowly add the cubes of butter. Mix for two or three minutes. The butter should be well cut into the dough. After all the pieces of butter are added, increase speed slightly. Slivers of butter should remain visible. If some bigger chunks remain, work the bigger pieces of butter into the flour between your fingers.
- Beat the egg in with the crème fraîche and mix it into the dough with the mixer still on low. The dough should start binding together. Add water if needed to improve texture.
- Turn out the dough onto a cutting board (or work surface). Using your hands, quickly work the dough together into one ball.
- Roll the dough into one or two discs, depending on your plans for use. Cover with wrap and refrigerate for at least two hours. If not using both immediately wrap it well and it will freeze well for at least two months.
To partially bake shell (if using a tart pan, not necessary for galettes)
- Center a rack in the oven and preheat to 375°F.
- Roll out the dough on a floured surface or between two pieces of wax paper. The disc shape should start you on the way. Work quickly to keep dough cold while rolling not stretching. If working on a floured surface turn the dough with a quarter turn frequently to keep from sticking. With the paper lift and adjust to keep from sticking.
- Place the dough inside the tart pan. Carefully push into corners without stretching. Trim excess dough from edges and save it for another use. Prick the surface of the dough slightly with a fork to prevent air bubbles. Only 4 or 5 pricks should be needed. Coat the dough with foil or parchment paper. Fill with dried beans or pie weights.
- Bake for about 20 minutes until crust edges are lightly browned. (This assumes there will be approximately 30 minutes more baking after the tart is filled. Adjust as needed.)
Recommended Products


Nutrition Information:
Yield: 8 Serving Size: 1 gramsAmount Per Serving: Calories: 270Total Fat: 16gSaturated Fat: 10gTrans Fat: 1gUnsaturated Fat: 5gCholesterol: 64mgSodium: 366mgCarbohydrates: 27gFiber: 1gSugar: 3gProtein: 4g
The 11″ (28cm) Version

The Perfect Sweet Tart Crust 11" (28cm) Version
Makes an 11" (28cm) Shells or 2 4-serving galettes
Ingredients
- 255g (9 ounces or 1 ¾ cups) Flour
- 28g (1 ounce or 2 tablespoons) Sugar
- 6g (1 teaspoon) Salt
- 1 large egg
- 120g (4.25 ounces or 8.5 Tablespoons) butter chilled and cut into about ½ inch (1 cm) cubes
- 30g (1 ounce) crème fraiche
- 30ml (⅛ cup) water, cold
Instructions
To make the dough
- If using a mixer, chill the bowl, paddle in the freezer for at least 20 minutes.
- Whisk the flour, sugar, and salt together.
- Assemble the mixer and bowl, add dry ingredients. With the mixer on low again, slowly add the cubes of butter. Mix for two or three minutes. The butter should be well cut into the dough. After all the pieces of butter or added, increase speed slightly. Slivers of butter should remain visible. If some bigger chunks remain, work the bigger pieces of butter into the flour between your fingers.
- Beat the egg in with the creme fraiche and mix into the dough with the mixer still on low. The dough should start binding together. Add water if needed to improve texture.
- Turn out the dough onto a cutting board (or work surface). Using your hands quickly work the dough together into one ball.
- Roll the dough into a disc. (Or 2 discs, if using for galettes ) Cover with wrap and refrigerate for at least two hours. If not using immediately wrap it well and it will freeze well for at least two months.
To partially bake shell (for tart pan only)
- Center a rack in the oven and preheat to 375°F.
- Roll out the dough on a floured surface or between two pieces of wax paper. The disc shape should start you on the way. Work quickly to keep dough cold while rolling not stretching. If working on a floured surface turn the dough with a quarter turn frequently to keep from sticking. With the paper lift and adjust to keep from sticking.
- Place the dough inside the tart pan. Carefully push into corners without stretching. Trim excess dough from edges and save it for another use. Prick the surface of the dough slightly with a fork to prevent air bubbles. Only 4 or 5 pricks should be needed. Coat the dough with foil or parchment paper. Fill with dried beans or pie weights.
- Bake for about 20 minutes until crust edges are lightly browned. (This assumes there will be approximately 30 minutes more baking after the tart is filled. Adjust as needed.)
Recommended Products
Nutrition Information:
Yield: 8 Serving Size: 1 gramsAmount Per Serving: Calories: 270Total Fat: 16gSaturated Fat: 10gTrans Fat: 1gUnsaturated Fat: 5gCholesterol: 64mgSodium: 366mgCarbohydrates: 27gFiber: 1gSugar: 3gProtein: 4g